Before your first flight with water ballast, there are a few things that you should do. If your glider has removable bags, pull them out, place them on a sloping surface and fill them with water – looking for leaks. Patch any leaks that you find and make sure that the valve system is working ok. Patching methods depend upon the construction of your bags, but usually, a life raft, inflatable boat, or swimming pool liner repair kit will do the job. Some bags are reinserted into the wing using a string at the wing tip (used to pull the bag in), while some can be inserted with a long length of PVC water pipe. Patting down the empty bags with talc or baby powder can help them slide back in easier. If your glider has integral wing tanks, fill the tanks with the wings on sawhorses to check for leaks. I use a plumber’s silicone grease for small leaks because it does not attack rubber.
Also, before your first flight with water ballast, fill the system with the glider assembled on the ground and the tail at flying height, and time with your watch how long it takes for the system to empty (you will be surprised). Timing will be slightly different in the air – but a ground test is close enough to approximate. It’s also useful to calculate the wing loading you will achieve with a full, ½, and ⅓ load of water. Depending on the conditions, this will help you decide how much water to use. For first flights in a glider with a bag system, I recommend filling the bags so that a wing drop on takeoff does not cause the water to slosh to the tip, causing a ground loop. Bag systems rarely hold a lot of water anyway.
Put The “Run” In Wingrunner
It’s always important to have the wing runner check for the wings to be balanced before takeoff (and to know how to make balance adjustments by briefly raising or lowering a wing). You should pick a young healthy wingrunner who will run – because the slower-than-normal initial acceleration makes it likely that a wing can drop before aileron control is gained. Ask the tug pilot to power up a bit with the wheel brakes engaged before releasing them (this helps with the initial acceleration) and ask the tug pilot for an extra seven mph / 5 knots of speed over a “normal” tow speed. Expect the initial acceleration to be a bit slow, expect a bit longer time for the glider to become airborne, and the glider to feel a bit more sluggish in roll response than normal. You will get used to it quickly. If you don’t have a flight computer that will tell you the inter-thermal speed to fly with ballast, I suggest cruising 8 to 10 mph faster than your usual unballasted speeds and seeing how that feels and works out. The biggest difference you will notice in flight is the inertia effect of the extra weight in pull-ups. So, if you are joining another glider thermalling, slow down a bit early as you will be surprised at how much altitude you gain on the pull-up.
When to Dump?
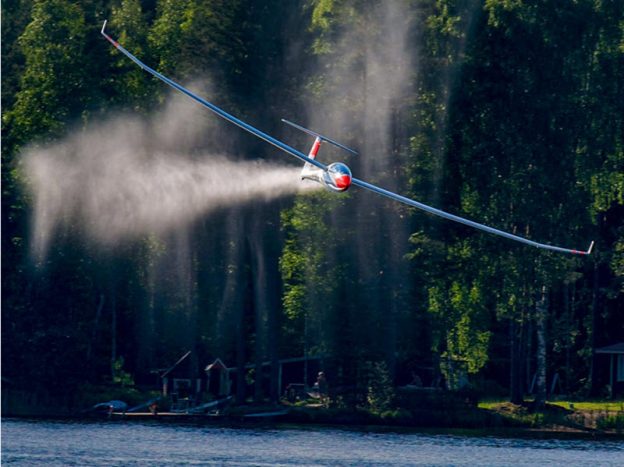
The best advice I ever received about when to jettison ballast came from the great Canadian pilot, Jerzy Szemplinski, who used to say, “If you are thinking about dumping the water, dump it all and right now!” That’s still good advice. When you are low and scratching, we always think we will “need” the ballast later – but the risk that there will not be a “later” is too great. Be quick to dump it as conditions or your situation changes – but be courteous about where to dump it. Never dump water in a thermal with gliders below you. There is no better way to get a bad reputation.
Ballast Filling, Maintenance, and Modifications
Never make a direct, non-well-vented connection of a water hose to your ballast bags or tanks. The hydraulic pressure is more than enough to split the wing open. The water inlet (if on top of the wing) should allow the hose outlet to fit loosely with air escaping around it. If the bag or tank has a vent outlet during filling, check the vent with a moistened finger for the feel of the evacuating air. If your glider fills from the underside or by the wing root, use an inlet hose connected to a funnel raised on a wing stand and run the hose into the funnel. Support the wing being filled with a wing stand, and understand the sequence of filling the tail tank and the wings – If the tail tank fills through the dump valve, it must be filled before the wings.
The perennial problem with ballast systems is leaking outlet valves – usually caused by dirt grains or vegetation specks on the valve seat surface. Sometimes this can be fixed by wiping a clean cloth around the valve seat surface and/or “snapping” the valve open and closed once or twice. Older Schempp Hirth gliders have a neat threaded hole in the valve seat that allows you to thread in the tail assembly tool and pull the valve seat fully closed. Newer Schleicher gliders have a flapper-type valve seat that occasionally needs to be cleaned by running a cloth around the inside edge of the drain hole. Some owners chose to lather the leaking valve seats with petroleum jelly or ChapStick but that is generally a stop-gap measure that leads to more messy problems later. Don’t obsess if you have a slight drip at the outlet – a once-per-second drip will yield only about one gallon in 5 hours and the wing flex in flight may well correct the problem.
If you are fortunate enough to have a brand-new glider, rinse the integral tanks several times before use (this removes all the construction debris), and then purchase an RV water filter for your fill hose. This will keep the dirt out of the tank and help prevent valve problems. Other useful items to have: a garden-type water flow meter, bright red tape (useful if you must temporarily tape a vent hole closed to prevent ground leakage), plastic water cans (Walmart sells cube-shaped 25 litre / 6.6 US gal. blue cans that are great), a 50’ garden hose kept in the trailer, and a spare set of fill caps.
Even with new gliders, some owners tinker with the system a bit. One common modification is to drill a ¼ “hole in the upper surface fill cap slot to function as an extra vent (this extra vent shortens the dumping time). Another is to make a retarding device for the tail dump so that the tail tank drains at the same rate as the wing tanks (check with your manufacturer before doing this). The question of drying the inside of integral tanks is very controversial and, in some cases, dependent on the type of wing/tank construction. Pilots are all over the place on this issue. I’ve known pilots who regularly land with ballast and keep water in the tanks for weeks. I’ve also known pilots who have made mini electric fans to circulate air to dry the tanks after each use. You can pick your own side in this debate. For me, I just drain the wings well and leave the fill caps off when the glider goes into the trailer.
Issues in the Air
I know that some of the new flight computers have an interface with the ballast system that helps you calibrate the time to dump, figure out the percentage of ballast remaining, and even determine the resulting wing loading after a partial dump. Frankly, I am not convinced that these interfaces are all that reliable or useful. As you fly more with ballast you get a “feel” for the glider changing wing loading during and after a partial dump. I usually do partial dumps in 30-second intervals until I get to the point where I am comfortable with how the machine feels to me for that point in the day. If you learn to do it by feeling you can keep your eyes and your head outside the glider instead of focusing on the computer.
In most instances, you will jettison the ballast before landing but occasionally you may decide to land with the ballast on board (for example, early in the day if you need a relight, or places where water is scarce). This is usually a nonevent, and the approach speed should be no more than 5 mph above the speed you would normally use with no ballast. It also sometimes occurs (due to a valve or vent problem) that only one wing drains. If that occurs (detectable by the glider requiring aileron input to maintain straight flight), you should stop dumping and land the glider with the remaining water on board. Do not worry – modern gliders are fully tested and certified to fly and handle safely in extreme asymmetrical ballast situations – but they will drop the heavy wing near the end of the rollout and veer or loop in that direction. So, on landing with this problem, position yourself close to the side of the field of the “light” wing – giving room for the ground loop if it occurs. Source: ‚Roy Bourgeois, Wings & Wheels‚, Image: ‚Mika Ganszauge‚.
